|
So to make a paper mache mask you will need paper such
as newspaper. To make the circular formation (to make it
like a mask) you blow up a balloon and then you staple a
piece of paper together to make a circle so the balloon
stays put. Then get your dinosaur snot (paper mache
glue). Then take the newspaper and rip it into little
strips. Then you dip the strips into the dino snot. Then
take your fingers and ring out the extra gunk. Then lay
the strips all over the face of the balloon. Then smooth
out any area that has bumps from the paper. Then apply
layers of paper so it’s thick and sturdy. Then you let
it dry over night. Once it’s dry and thick enough you
take primer and cover the whole mask. Next Layers of
primer. So the masks get stronger. If your going to
make a nose, ears, bulging eyes, or any body part you
want to look sorta 3D, cut it out of cardboard. Then
tape it to your mask. Then you cover it with the strips
and dinosaur snot. Get good layers so it stays n your
mask. Then once it’s dry cover it with primer. Do that a
couple times. Once everything is dry you can start
painting. Unless you have to cut out eyes or a mouth
from the mask. Then you do that first, and then you
start painting. Preferably use acrylic paint. Then once
you’re done let it dry. Then you’re done! ~Coral
Tengdin
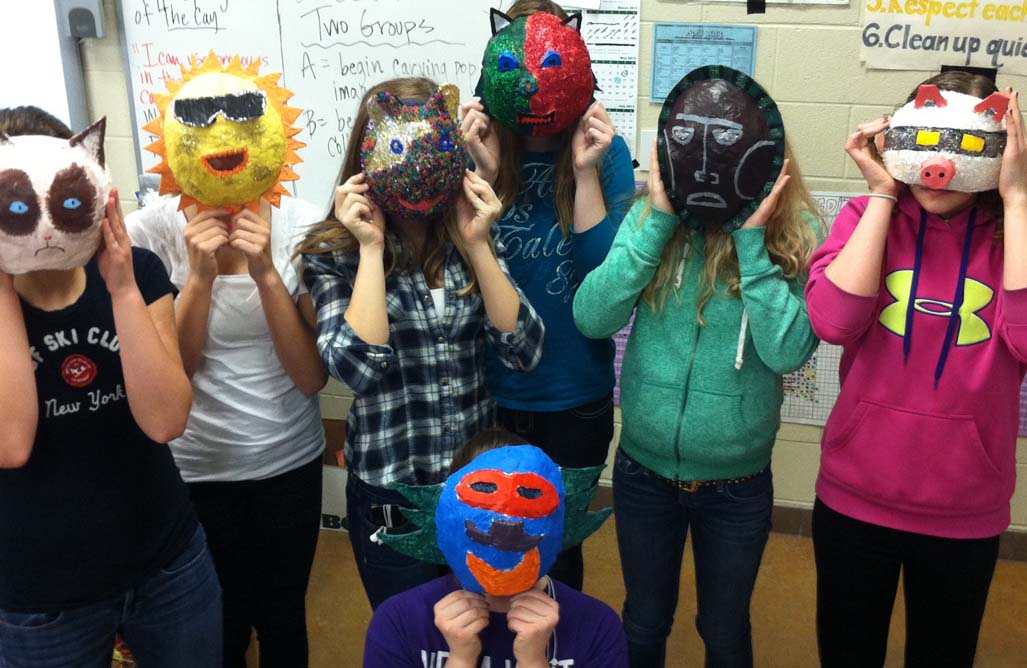
She is an African and Egyptian themed with a brown cobra
crown. It has beautiful jade eyes and spots on the inner
hood. The girls face is gold with a blue crescent moon
on the right cheek and a blue swirl with star on the
other. Around her eyes she has dark gray circles. On her
eyes she has plumb purple eye shadow with dark winged
eyeliner. She has no iris and no purple. Her eyes are
just white. ~Erika Bartosiewicz
For the past few weeks we have been making masks. It
has been really fun. My mask is a bear. It has beads
all over it. It is also covered in sparkles. Underneath
the sparkles and beads it is painted pink and purple.
This has been my favorite project so far. ~Kassidy Ward
The past weeks we have been making are
masks. Making masks is really fun. The first thing we
did is we looked up masks on the Internet. Then you
paper Mache the balloon then you pop the balloon and
then you paint it and when you are done painting it you
put beads, sparkles and other stuff. I really like
making masks and I want to do it again real soon!
~Ashlee F.
Making masks was super fun. We got to use
Paper Mache, primer, and acrylic paint. We had to take a
balloon and put Paper Mache on it on it. Then put primer
on it to make it sturdy. Then painted designs on it to
make it look cool. The whole process took a while, but
it was worth it for such a cool mask. ~Austin Sovereign
My mask is of a frog, but because I was
not here when they started mine is actually not a mask
it is a sculpture I made it out of a paper roll and put
ends on it and added beads. I still did mache my
sculpture with newspaper and some glue. Primed so the
newspaper wouldn’t show, then I painted it green, and of
course added sparkles! It took me about two weeks to do
all that and I think it looks great! ~Ashley Elo
This year in art, we
made paper mache masks. It was really fun. The first
thing we did was go on the computer and looked up
different masks, and drew a sketch. Next, we blew up
balloons and stapled a strip of paper together to
support the balloon. Then we covered the whole thing in
paper mache. We had to put more than one layer of
newspaper on to make it stronger. Here’s a tip, when
you layer the newspaper, put the strips in almost x’s to
make it even stronger. When we were done paper macheing
we popped our balloons and used cardboard to make
details like eyes and noses. After that we paper mached
those to the mask. When it was dry we used a primer to
cover up the newspaper for when we paint. The paint we
used is acrylic paint. You have to be careful though,
the paint might not come out of your clothes. Finally,
after our masks were done, we were able to add other
things like beads, pipe cleaner, feathers and glitter.
Overall, the project was really fun. -Kelly Hall |
In the past few weeks we have been making masks. It’s
hard to pick what you want it to look like. But if
you’re like me I just went with the flow. So I just cut
my mask down, then I put horns on it and the nose. Then
I cut the eyes out. And at last I painted the mask with
acrylic paint, then I painted the horns. Also I put a
symbol on it from one of my favorite games. And that’s
how I made my mask.
-Tanner Hearit
This semester we made a mask out of paper
mache. We put paper mache on a balloon to start the
initial mask. We then put details made out of cardboard
and put paper mache on those. We then painted the whole
thing with primer to get rid of the details in the
newspaper. We then painted the mask with colors based on
a mask we found online that we liked. This is how we
made a mask this semester. ~Tighe Pepera
First we blew
up a balloon. Then we put paper mache on the balloon.
Then we put the feachel fecher on it. Then we primed it.
Then we painted it. Then we were done.
~Matt DeLeon
We did a mask project and it was really fun. First we
searched masks up on the computer such as different
culture masks. Then we sketched our own masks with the
details we saw on the masks from the computers. Then we
blew up a balloon. The balloon was for the shape of our
faces. Next we paper mache the balloons, we put about 3
to 4 layers or more of it on the balloon. When we got
done putting on paper mache we put our details on our
mask from what we sketched on the drawing of our mask.
Then when we got done putting details on it we primed
the details after we put paper mache on it. After the
primer dried we got to paint them very colorful. At the
end we got to put decorations on the masks. It was a
very fun project. ~McKayla Haske
My mask took a long time to make. The
first thing we did was research masks. When I found the
basis to make a good demon mask, I began working on it.
We had to paper mache balloons, make cardboard features,
and prime it. I used cardboard to make a nose and horns.
After I was done with all this, I began the last part,
painting. For, most of the face, I mixed red and black
acrylic paint to get a dark red color. I then painted on
black eyebrows, a mouth with fangs, and dark green war
paint. After painting everything on the face, I just
needed to paint the horns grey and I was done. In the
end, I had a really cool mask that I had fun making.
~Jarrod Berard
The first thing we did to make our masks is
we searched different kinds of masks. Next we took the
things we liked and made our mask. After we drew our
mask we blew up a balloon and paper mached the balloon.
When we were done paper macheing we added our designs
then paper mached over those. When we were done with
that we had to prime our mask. After that we painted our
masks with acrylic paint and added details. Then we were
done making our masks. I had a lot of fun making my
mask. ~Michele Haske
This month we have
been making a mask. The first thing we did is take paper
mache and put it on a balloon. Then we let the paper dry
on the balloon then we popped the balloon. Then after
that we prime the paper mache. We started putting faces
on it after that. After that we finally painted it.
~Mark S.
Making masks has been really fun! At first I wasn’t sure
what I was going to do with mine. I just went along
adding details. My mask is mostly reflected on a pig. It
has pig ears and a pig nose. There’s a mask on the eyes
of the pig. The eyes are gold. While the ears and nose
are pink, the mask on the pig is black with sparkles.
The rest of the pigs face is white with snow glitter on
it. I loved the way my mask turned out! ~By: Marilyn
Bowers
Mrs.
Woolman's main page
Onekama High School 2012-2013
April 2013 |